Collimation of the 18" Obsession using the Howie Glatter laser collimator, TuBlug and the square grid pattern: A step by step guide
Step 1: The focuser
I changed the focuser on my 18" Obsession last year from the standard JMI NGF-DX3 focuser to a Starlight Instrument Feather Touch focuser. I never really checked if the focuser was mounted correctly, so this was the first thing I did.
- Remove the secondary mirror holder from the upper cage.
- Put the Howie Glatter laser collimator (with the standard aperture stop) in the focuser.
- Use a steel square to measure the distance from the bottom of the upper cage to the laser beam (close to the laser).
- Make sure the distance at the overlying side of the upper cage is the same, by adjusting the base of the focuser.
- Make sure the distance from the bottom of the upper cage to the laser beam at the overlying side does not change when turning the focuser in and out.
- Insert the secondary mirror holder again in the upper cage.
 |
| Measuring the distance from the bottom of the upper cage to the laser beam. |
I checked everything and I could see that my focuser was perfectly aligned. Good news!
Step 2: The offset of the secondary mirror
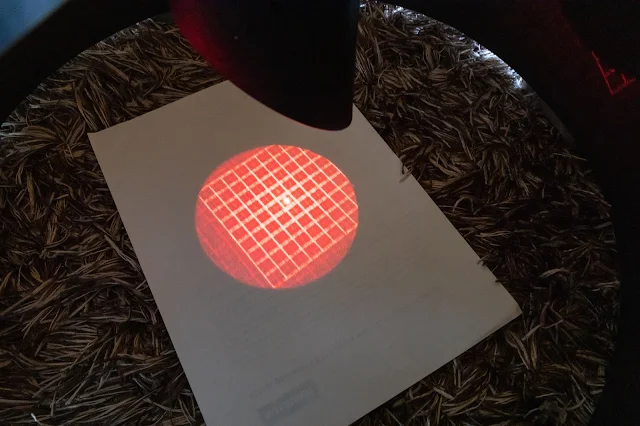
In fast telescopes (like the 18" Obsession f/4.5), the secondary mirror should not exactly be centered. The amount of offset needed is easy to calculate and can be found on a lot of pages on the internet. This is especially needed when the secondary mirror is quite small. Using the Howie Glatter laser with the square grid pattern, it is very easy to offset the secondary mirror without calculating the needed offsets.
- Put the Howie Glatter laser collimator (with the square grid pattern) in the focuser.
- Put a white paper under the secondary mirror to easily see the square grid. The grid should be centered in the illuminated circle.
- Move the secondary mirror up or down. This will make it possible to center the square grid in one direction.
- To center the square grid in the other direction, it is possible to change the position of the secondary mirror a bit by turning screws which connect the spider to the upper cage. If that does not help enough, the focuser should be tilted a bit.
 |
| The secondary mirror doesn't have the correct offset |
 |
| The square grid pattern after changing the height of the secondary mirror in the upper cage. |
Step 3: The rotation of the secondary mirror
Now that the secondary has the correct offset, it is time to check the rotation of the secondary mirror. I used the laser collimator with the square grid pattern and rotated the secondary mirror holder around its axis while looking at the grid towards the primary mirror. By centering the grid, the rotation of the secondary mirror will be correct.
 |
| The square grid pattern centered on the primary mirror. |
Normally, the focuser position (step 1), the secondary mirror offset (step 2) and the secondary mirror rotation (step 3) will not change at all between observing sessions and should not be checked every time the telescope is used. It can be good however to check step 1, 2 and 3 after a long drive to a dark observing site. Step 4 and step 5 should be checked before every observing session. Normally, Obsession telescopes keep their collimation quite well during an observing session, but it is anyway useful to check the collimation (step 4 and step 5) a few times during the night.
Step 4: Tilt the secondary mirror
The tilt of the secondary mirror can be adjusted by rotating the long with screws on the primary mirror holder of the Obsession. The laser collimator should be used with the standard aperture stop. By turning the screw, make sure that the laser beam hits the primary mirror exactly in the center.
Step 5: Tilt the primary mirror
To adjust the primary mirror, use the laser collimator with the TuBlug. The TuBlug has an integrated barlow, making it possible to use the barlowed laser technique. The reflection of the central marking on the primary mirror can be seen in the TuBlug. By turning the collimation bolts of the primary mirror, the reflection can be centered, which terminates the collimation process.
 |
| The reflection of the primary mirror marking. The telescope is clearly not collimated. |
 |
| The reflection of the primary mirror marking. The telescope is almost perfectly collimated. |
Based on the information on the webpages of the Howie Glatter laser collimators and of Nils Olof Carlin (1, 2, 3).


Comments
Post a Comment